Tenant Guide by Swift Cleaning Services
Moving out of a rental property? End of lease cleaning is one of the most important tasks before you return the keys. This guide explains what it means, what is included, and how to prepare your property for the final inspection.
What Is End of Lease Cleaning?
End of lease cleaning is a detailed move-out cleaning process. A tenant completes it before handing the rental property back to the landlord or property manager.
The goal is simple: remove dirt, dust, grease, stains, and built-up grime from every room, surface, and appliance so the property is ready for inspection.
In plain terms: Tenant moves out → property is cleaned → final inspection happens → property condition is compared with the entry report → bond or deposit decisions are made.
How It Differs from Regular House Cleaning
Regular cleaning means wiping surfaces, vacuuming, and keeping a home tidy week to week.
End of lease cleaning goes much deeper. It covers areas that are often skipped during routine cleaning, such as oven interiors, rangehood filters, window tracks, shower grout, skirting boards, and exhaust fans.
| Regular Cleaning |
End of Lease Cleaning |
| Weekly tidy-up |
Done once at end of tenancy |
| Surface-level clean |
Deep clean of all rooms |
| No formal checklist needed |
Checklist-based, room by room |
| No inspection link |
Connected to final inspection |
How It Relates to Final Inspection and Property Handover
At the end of a tenancy, the property manager or landlord inspects the property. They compare its current condition against the entry condition report completed when the tenant moved in.
If cleaning issues are found, the tenant may be asked to re-clean, or costs may be deducted from the bond or security deposit.
End of lease cleaning helps reduce the chance of those issues by preparing the property before the inspection takes place.
Why Entry and Exit Condition Reports Matter
The entry condition report records the property's condition at the start of the tenancy. The exit condition report records it at the end. These two documents are compared during the final inspection.
Queensland tenancy guidance advises tenants to leave the property in the same condition as at the start of the tenancy, allowing for fair wear and tear, and to check the entry condition report and any photos from move-in.
Victoria's consumer authority also notes that condition reports can be important evidence in any disputes about cleaning, repairs, or bond claims.
Always check your lease, entry condition report, and local tenancy authority guidance before you start cleaning.
Why End of Lease Cleaning Matters Before Moving Out
The final inspection is the key moment where the property's cleanliness is reviewed. A poorly cleaned property can lead to delays, disputes, or deductions from your bond.
Preparing the property well before inspection reduces the risk of having to return for a re-clean.
Fair wear and tear refers to the normal, gradual deterioration of a property through ordinary use. For example, a small scuff on a wall from furniture is fair wear and tear. A large grease stain on the stovetop from lack of cleaning is not.
End of lease cleaning deals with cleaning issues. It does not repair damage. Understanding this difference helps tenants know what they are responsible for.
Cleaning is one of the most common reasons bonds or security deposits are disputed. A thorough end of lease clean gives the tenant a stronger position in any discussion about the property's condition.
What Is Usually Included in End of Lease Cleaning?
Oven, Cooktop, Rangehood, Sink, Cupboards, Benchtops
The kitchen is one of the most inspected areas during a final inspection. Key tasks include:
- Cleaning the oven interior, racks, and glass door
- Degreasing the cooktop, burners, and splashback
- Cleaning the rangehood, filters, and exhaust grille
- Wiping down benchtops, cabinet doors, and drawer fronts
- Cleaning inside cupboards and drawers, including corners
- Scrubbing the sink, taps, and drain area
Bathroom and Laundry Cleaning
Shower Screen, Toilet, Taps, Tiles, Grout, Mirrors, Exhaust Fan
Wet areas need descaling, scrubbing, and detailed attention. Key tasks include:
- Removing soap scum and limescale from shower screens and glass
- Scrubbing tiles and grout lines
- Cleaning the toilet bowl, seat, lid, and base
- Descaling taps and fixtures
- Wiping mirrors and vanity surfaces
- Cleaning the exhaust fan cover
- Scrubbing the laundry tub and washing machine area
Bedroom and Living Area Cleaning
Floors, Skirting Boards, Wardrobes, Doors, Light Switches
Bedrooms and living spaces need thorough dust removal and surface cleaning. Key tasks include:
- Vacuuming and mopping all floor surfaces
- Wiping skirting boards and door frames
- Cleaning inside wardrobes, including rails, shelves, and corners
- Wiping light switches, power points, and door handles
- Removing cobwebs from corners and ceilings
- Dusting light fittings and ceiling fans
Window, Track, and Glass Cleaning
Interior Glass, Sills, Tracks, Frames, Sliding Door Rails
Window tracks are one of the most commonly missed areas in end of lease cleaning. Key tasks include:
- Cleaning interior glass panels and window panes
- Scrubbing window sills and frames
- Removing dirt and debris from window tracks and sliding door rails
- Wiping fly screens where applicable
Floor and Carpet Cleaning
Vacuuming, Mopping, spot cleaning, and steam cleaning where needed.
Hard floors need to be vacuumed and mopped. Carpets need thorough vacuuming and spot treatment. Depending on the lease terms and property condition, carpet steam cleaning may also be required.
Check your lease and entry condition report to understand what carpet cleaning standard is expected.
Balcony, Garage, Patio, Bin Area, Storage Space
Outdoor and extra areas are often forgotten until the last minute. Key tasks include:
- Sweeping and mopping balcony or patio surfaces
- Cleaning balcony edges, rails, and screens
- Sweeping or hosing down the garage floor
- Emptying and cleaning the bin area
- Clearing storage spaces of all personal items
What Is Not Usually Included in End of Lease Cleaning?
It is important to understand the limits of end-of-lease cleaning. Most cleaning services do not cover:
Scratched floors, broken fixtures, holes in walls, and cracked tiles are damage issues, not cleaning issues. These need separate repair arrangements.
Pest treatments such as flea treatment, cockroach treatment, or rodent control are separate to cleaning and require licensed pest control services.
Surface mould in bathrooms can often be addressed during cleaning. However, deep or structural mould issues require specialist remediation, not standard cleaning.
End of lease cleaning assumes the tenant has removed all furniture and personal belongings. Large rubbish items, abandoned furniture, or skip bin loads are not part of standard cleaning.
Repainting walls, filling holes, repairing fixtures, and replacing broken items fall under maintenance or repair work. These are outside the cleaning scope.
Some tasks, such as external high-rise window cleaning, hazardous waste removal, or asbestos handling, require specialist services with specific licences and equipment.
End of Lease Cleaning vs Bond Cleaning vs Move-Out Cleaning
Are These Terms the Same?
In most cases, yes. These terms are often used for the same type of cleaning:
- End of lease cleaning — the full cleaning process before handing back the property
- Bond cleaning — cleaning focused on meeting inspection standards so bond is not deducted
- Move-out cleaning — cleaning done as part of the moving process
- Vacate cleaning — another common term for the same task
The terms vary by region, property type, and personal habit. In Queensland, "bond cleaning" is very common. In Victoria and New South Wales, "end of lease cleaning" or "move-out cleaning" is more frequent.
Property managers are generally focused on whether the property is clean to the required standard for re-letting. The term used matters less than whether the cleaning scope matches inspection expectations.
Whatever term you use, what matters is whether every required area has been cleaned. A checklist-based approach ensures no room, surface, or detail is overlooked, regardless of what the cleaning type is called.
How End of Lease Cleaning Works Step by Step
Before you clean anything, check your lease for any specific cleaning requirements. Then review the entry condition report and any photos from when you moved in. This tells you the cleaning standard expected at handover.
All furniture, boxes, and personal items should be removed before you start cleaning. Cleaning around furniture misses hidden dirt and makes the task harder. Empty rooms are easier to clean thoroughly.
Work through each room using a structured checklist. Start at the top of each room (ceilings, fans, and vents) and work downward (walls, surfaces, and floors). This prevents dust and debris from falling onto already-cleaned areas.
After the main clean, go back and check the areas most likely to be flagged during inspection: oven interior, rangehood filters, window tracks, shower glass, bathroom grout, skirting boards, and cupboard interiors.
Walk through every room and take clear photos or a video after cleaning is complete. Capture kitchens, bathrooms, floors, windows, and any areas that were noted in the entry condition report. Keep these photos as evidence.
Where possible, attend the final inspection with the property manager. This lets you address any concerns on the spot. If you cannot attend, ask for a written inspection report.
Common Areas Tenants Forget to Clean
These areas are frequently missed and are often checked closely during final inspections:
- Oven Interior and Rangehood Filters
Baked-on grease inside ovens and blocked rangehood filters are among the most common inspection issues.
- Window Tracks and Door Rails
Dirt, dust, and dead insects build up in window tracks and sliding door rails. These are easy to miss but clearly visible during inspection.
- Skirting Boards and Door Frames
Dust and marks on skirting boards and door frames are a common inspection finding, especially in hallways and bedrooms.
- Bathroom Grout and Shower Glass
Soap scum on shower glass and stained grout lines are closely checked in wet areas.
- Cupboard Interiors and Drawer Corners
Food crumbs, dust, and residue inside cupboards and drawers are easy to overlook but are often inspected.
- Exhaust Fans, Vents, and Ceiling Fans
Dusty exhaust fan covers, air vents, and ceiling fan blades are commonly missed during move-out cleaning.
- Balcony Edges and Garage Floors
Outdoor areas listed in the lease must also be cleaned. Balcony corners, edges, and garage floors are often left until last and then rushed.
DIY End of Lease Cleaning vs Professional Cleaning
DIY end-of-lease cleaning can work well when:
- The property is small and lightly used
- You have enough time before the final inspection
- You have access to the right tools and cleaning products
- You are comfortable working from a detailed checklist
Professional cleaning may be more practical when:
- The property is large or heavily used
- Specific tasks such as oven cleaning, carpet cleaning, or detailed bathroom cleaning are needed
- Time is limited before the inspection deadline
- You want a documented, checklist-based clean with clear scope
A full end of lease clean for a standard two-bedroom apartment can take six to twelve hours or more depending on the property's condition. Professional cleaners bring specialist equipment such as HEPA vacuums, steam cleaners, and commercial degreasers that most tenants do not have at home.
Whether you clean yourself or hire help, confirm the cleaning scope in advance. Check that all rooms, surfaces, appliances, windows, and outdoor areas listed in your lease are covered. A clear scope reduces confusion and reduces the chance of missing anything before inspection.
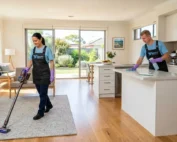
How Swift Cleaning Services Can Help with End of Lease Cleaning
Swift Cleaning Services approaches end-of-lease cleaning with a structured, checklist-based method. This means every room is covered systematically rather than relying on memory or a rough walkthrough.
Each room is cleaned in sequence, from ceilings and fans down to floors and tracks. This room-by-room approach helps ensure that commonly missed areas such as rangehood filters, window tracks, and cupboard interiors are addressed as part of the standard process.
Different surfaces need different methods and products. Swift Cleaning Services uses surface-appropriate cleaning techniques, including degreasing for ovens and splashbacks, descaling for taps and shower screens, and gentle methods for delicate surfaces such as stone, glass, and timber.
Cleaning products should always be selected based on surface type and ventilation. The US EPA's Safer Choice programme provides guidance on lower-toxicity cleaning products reviewed for safer human health and environmental characteristics, which reflects the kind of product selection approach that responsible cleaning services use.
Swift Cleaning Services focuses on the areas most likely to be reviewed during a final inspection, including oven interiors, rangehood filters, bathroom grout, shower glass, window tracks, skirting boards, and outdoor areas.
Before work begins, Swift Cleaning Services clarifies what is included and what is not. This helps tenants understand exactly what the cleaning service covers and what may require separate arrangements, such as damage repair, pest control, or rubbish removal.
End of Lease Cleaning Checklist for Tenants
Use this checklist to track your progress before the final inspection.
- Oven interior, racks, and glass door
- Cooktop, burners, and control knobs
- Rangehood filters and exhaust grille
- Splashback and wall tiles near stovetop
- Benchtops and sink
- Taps and drain
- Cabinet doors and handles
- Inside all cupboards and drawers
- Dishwasher interior (if applicable)
- Refrigerator space cleaned after removal
- Inside wardrobes: shelves, rails, base
- Skirting boards
- Door frames and door surfaces
- Light switches and power points
- Window sills and tracks
- Floors vacuumed and mopped or carpets vacuumed
- Ceiling fan blades (if applicable)
- Cobwebs removed from corners
- Shower screen or bath surround
- Tiles and grout lines
- Taps, mixers, and showerhead
- Toilet bowl, seat, lid, and base
- Vanity, sink, and mirrors
- Exhaust fan cover
- Floor tiles and grout
- Towel rails and hooks
- Skirting boards and door frames
- Light switches and power points
- Floors vacuumed and mopped or carpets vacuumed
- Ceiling fan or light fitting
- Air vents or return air grilles
- Fireplace or heater surround (if applicable)
- Cobwebs removed
Windows and Tracks Checklist
- Interior glass panels wiped
- Window sills and frames
- Window tracks and sliding door rails
- Fly screens wiped (if applicable)
Floors and Carpets Checklist
- All hard floors vacuumed and mopped
- Carpet vacuumed thoroughly
- Carpet spots treated
- Steam cleaning arranged if required by lease
- Balcony or patio swept and mopped
- Balcony rails and edges wiped
- Garage floor swept or hosed
- Bin area cleared and wiped
- Storage spaces emptied and swept
- Kitchen: oven, benchtops, cupboards
- Bathrooms: shower, toilet, vanity
- Each bedroom
- Living areas
- Windows and tracks
- Floors
- Outdoor areas
- Any areas noted in entry condition report
Common Mistakes to Avoid Before the Final Inspection
The entry condition report sets the standard. If you clean without checking it, you may miss areas that were specifically noted at the start of the tenancy or spend time on things that were already noted as existing issues.
Hidden areas such as oven interiors, rangehood filters, and window tracks take time and effort. Leaving them until the final day creates rushed, incomplete cleaning. Tackle these early in the process.
Acidic cleaners can damage stone benchtops, unsealed grout, and certain metal fixtures. Always check surface compatibility before using strong degreasers or descalers. When in doubt, use a neutral cleaner or seek advice.
Taking photos after cleaning is as important as the cleaning itself. Without photo documentation, it becomes harder to demonstrate the property's condition if a dispute arises later.
A dirty oven is a cleaning issue. A broken oven door hinge is a damaged issue. Knowing the difference helps tenants understand what they are responsible for and what should have been noted as pre-existing damage on the entry report.
How to Prepare for a Smooth Property Handover
Do not start cleaning around furniture or boxes. Move everything out first, then clean. This reveals hidden dirt, gives you full access to floors, and makes the job faster and more thorough.
Once the property is empty, cleaning is more effective. You can access skirting boards, floor edges, corners, and areas that were blocked by furniture during the tenancy.
Keep copies of any cleaning receipts, product purchases, or professional cleaning invoices. Keep your post-cleaning photos in a safe place. These records are useful if any dispute arises after handover.
Before the final inspection, walk through every room with the entry condition report. Check each area against what was documented at the start of the tenancy. Note anything that may need attention.
Check what the lease requires for key return, utility finalisation, and property access. Confirm the final inspection date and time with the property manager so you are prepared.
Final Thoughts: What Tenants Should Understand About End of Lease Cleaning
End of lease cleaning is not just about making the property look presentable. It is a key part of the handover process. The property's cleanliness is compared to its condition at the start of the tenancy, so preparation matters.
A well-cleaned property with no photographic evidence is harder to defend in a dispute. Cleaning and documenting go together. Take photos after every room is finished.
The most common cause of cleaning disputes is missed areas, not poor effort. A structured, room-by-room checklist is the most reliable way to ensure nothing is overlooked before the final inspection.
For tenants who need help preparing a rental property for handover, Swift Cleaning Services in South Australia Adelaide offers a checklist-based, room-by-room cleaning service. Their approach addresses the areas most commonly flagged during final inspections and provides a clear cleaning scope before work begins.
Always check your lease agreement, entry condition report, and local tenancy authority guidance for the specific cleaning requirements that apply to your property and location. Tenancy rules vary by country, state, and region.